AR3NA masternode setup guide for windows
last updated: 12-10-2018
Prerequisites:
- A local computer running under Windows 7, 8.1 or 10 (x64 only) and working 24/7
- 10001 or more AR3NA as collateral (10000 AR3NA + 1 AR3NA to cover the transaction fees).
- AR3NA wallet for windows.
- External IP address. Rent it from your internet service provider.
Steps:
- Open the wallet
- Go to menu "Settings > Options"
-
Select "Wallet" tab, check "Enable coin control features" and "Show Masternodes Tab" checkboxes and click "ok" button.
when restarting app, a new tab "Masternodes" will be displayed.
- Go to menu "Tools > Debug console"
-
Type getaccountaddress "Masternode1", and press "enter" key. Copy it to notepad (something like 9xxxxxxxxxxxxxxx7sf4sJB7xxxxxxxxxxs)
NB: A new receiving address named "Masternode1" will be created.
-
Type masternode genkey, press "enter" key.
NB: Copy that key to notepad, you will need it later. Something like xxxxxxxxxxxxxxxxxxxxxWzueUX2wdmMogsbpWoxxxxxxxxxxxx).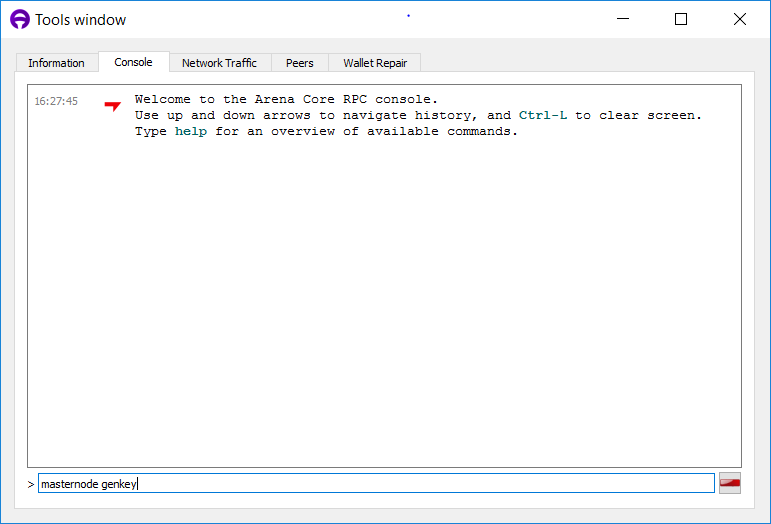
- Click on "Send" Tab
- Paste "Masternode1" address value (step 5) in "pay to" textbox, select an amount of 10000 coins.
- Uncheck "SwiftTX" checkbox and click on "send" button.
- Confirm sending by clicking on "yes" button.
-
Accept transaction fees by clicking on "yes" button.
It will appear as "Payment to yourself" and minus commission only. That is ok. Wait for 6 confirmations. It will take about 5 minutes. To check confirmations just double click on transaction. - Go to menu "Tools > Debug console"
-
type masternode outputs and press "enter" key.
NB: Copy text only to notepad without quotes and brackets. It will be your collateral_output_txid and collateral_output_index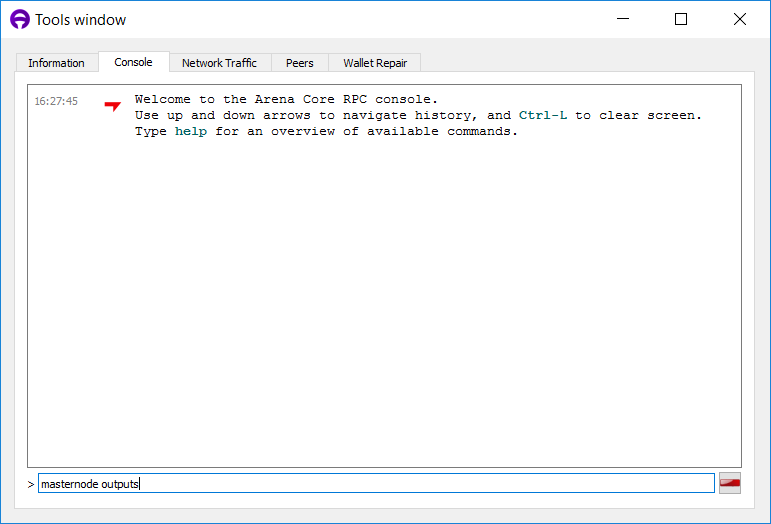
- Go to menu "Tools > Open masternode configuration file
-
add masternode information like this:
alias YOUR_PUBLIC_IP:27750 masternodeprivkey collateral_output_txid collateral_output_index
You can get your public ip by accessing to the following url https://www.whatismyip.com/
masternodeprivkey was generated at step 6
your collateral_output_txid and collateral_output_index were generated at step 13 - Save and close
-
Go to menu "Tools > Open wallet configuration file" and change the setting like this
onlynet=ipv4
addnode=45.76.221.101:27750
addnode=95.179.146.80:27750
addnode=95.179.176.61:27750
addnode=104.45.8.100:27750
addnode=140.82.56.254:27750
addnode=185.92.220.183:27750
addnode=198.13.39.141:27750
addnode=198.13.61.140:27750
rpcuser=YOURUSER
rpcpassword=YOURPASSWORD
rpcallowip=127.0.0.1
rpcport=27751
maxconnections=500
listen=1
server=1
daemon=1
port=27750
externalip=YOUR_PUBLIC_IP
masternode=1
masternodeprivkey=THE KEY SAVED ON STEP 6
NB: Replace YOURUSER and YOURPASSWORD by your own values - Save and close
- Open port 27750 on your firewall (windows, router, ...), and create NAT if needed
- Open the wallet, and wait for full synch
- Check the transaction of step 7
- Click on "Masternodes" Tab
- Select your masternode and click on "start alias" button
- Wait for 10, 20 min and your masternode status should change to ENABLED.